Sun/Amish Garden

I planted my Sun/Amish Garden in 2019, it consists of many beautiful flowers. During this time of the year, the tiger lilies are in full bloom. One of my favorites is this peach version. It is such a wonderful sight!

~ May all your wandering take you to many wonderful places!

Lisa

Let’s get creative with those hives!

I have decided to spruce up my apiary.  Why go with plain, simple, solid colored hives when you can paint scenes and designs on them?

I have joking told my husband, that as more woman get involved in beekeeping, the more decorated bee hives there will be.   Not that men are not creating amazing hive designs,  I’m sure there are many wonderfully painted hives done by men.  If you are one of them, post a picture below in the comments!

Here’s a few that I have painted….


A few that I am working on….


and a few that I am thinking about…

If you would like to see more, or how I transfer my designs onto a hive for painting, let me know.

~ May all your wandering take you to many wonderful places……   and, show me your painted hives, post a picture in the comments below.

Lisa

Spring in Winter & the sap is flowing

We’ve had our temps in the mid to upper 60s these last few days.  It is great being able to get outside without the winter boots and leggings. Yes, I wear adult winter leggings in the winter, it just makes it more comfortable when it’s in the teens (Fahrenheit) and the wind is blowing.

These last 2 days, I’ve been able to get out and work in my yard.  Raking all the leaves that were left behind from the fall.  And let me tell you, there’s always a lot of leaves piled in all the corners of the yard. I will be sore over the next couple of days, but it is well worth it.  It is always a great feeling to step back and enjoy how nice it looks when all cleaned up.

With the day temps reaching above 40 and the night temps still below freezing, the sugar maple trees have started to flow.  It is always nice to hear the drip, drip, drip, of the 1st drops of sap in the spring.

img_0191

I wanted to post a video, but my version of WordPress does not support video, but you can go to my facebook page  to check out the video.

We use a camp stove and we have 3 stainless steal 5-gallon pots that we use for boiling down the sap .  It takes 40 gallons of sap to make 1 gallon of syrup.

So far we have collected 60 gallons of sap, which will produce 1.5 gallons of syrup. I love the way our sap house turns into a steam room and the smell of the sweet maple air.

Now to dream of all the things we use our homemade syrup for… pancakes, waffles, French toast, fried ham steak, candied sweet potatoes and maple cookies.  Just thinking about it, makes my mouth water. Yum!

~ May all your wandering take you to many wonderful places.

Lisa


Just a quick note

Checked on my bees this weekend and all 4 hives are still doing well.  I was concerned with hive #4 (back, right hive), since the previous week they started spilling out when I had placed my stethoscope against each deep/super to see where they were. It was ~30 degrees F and as they came out, the ones already out were trying to get back in.  There weren’t a lot of bees, just a silver dollar size.

img_9113

It got me thinking, normally unhappy bees can indicate a problem.  Perhaps the queen was no longer alive or perhaps they were starving?

So this weekend, I returned to my apiary.  It was in the 20s and there wasn’t much I could do.  I pressed my ear on the top box and only heard a faint hum.  I moved down to the next box and was happy to find, that, that is where the colony resided. There was a nice calm hum, no angry bee sound.

I am thrilled that my bees have made it to February… now to make it to March.

~ May all your wandering take you to many wonderful places.

Lisa

1st hive inspection of 2017

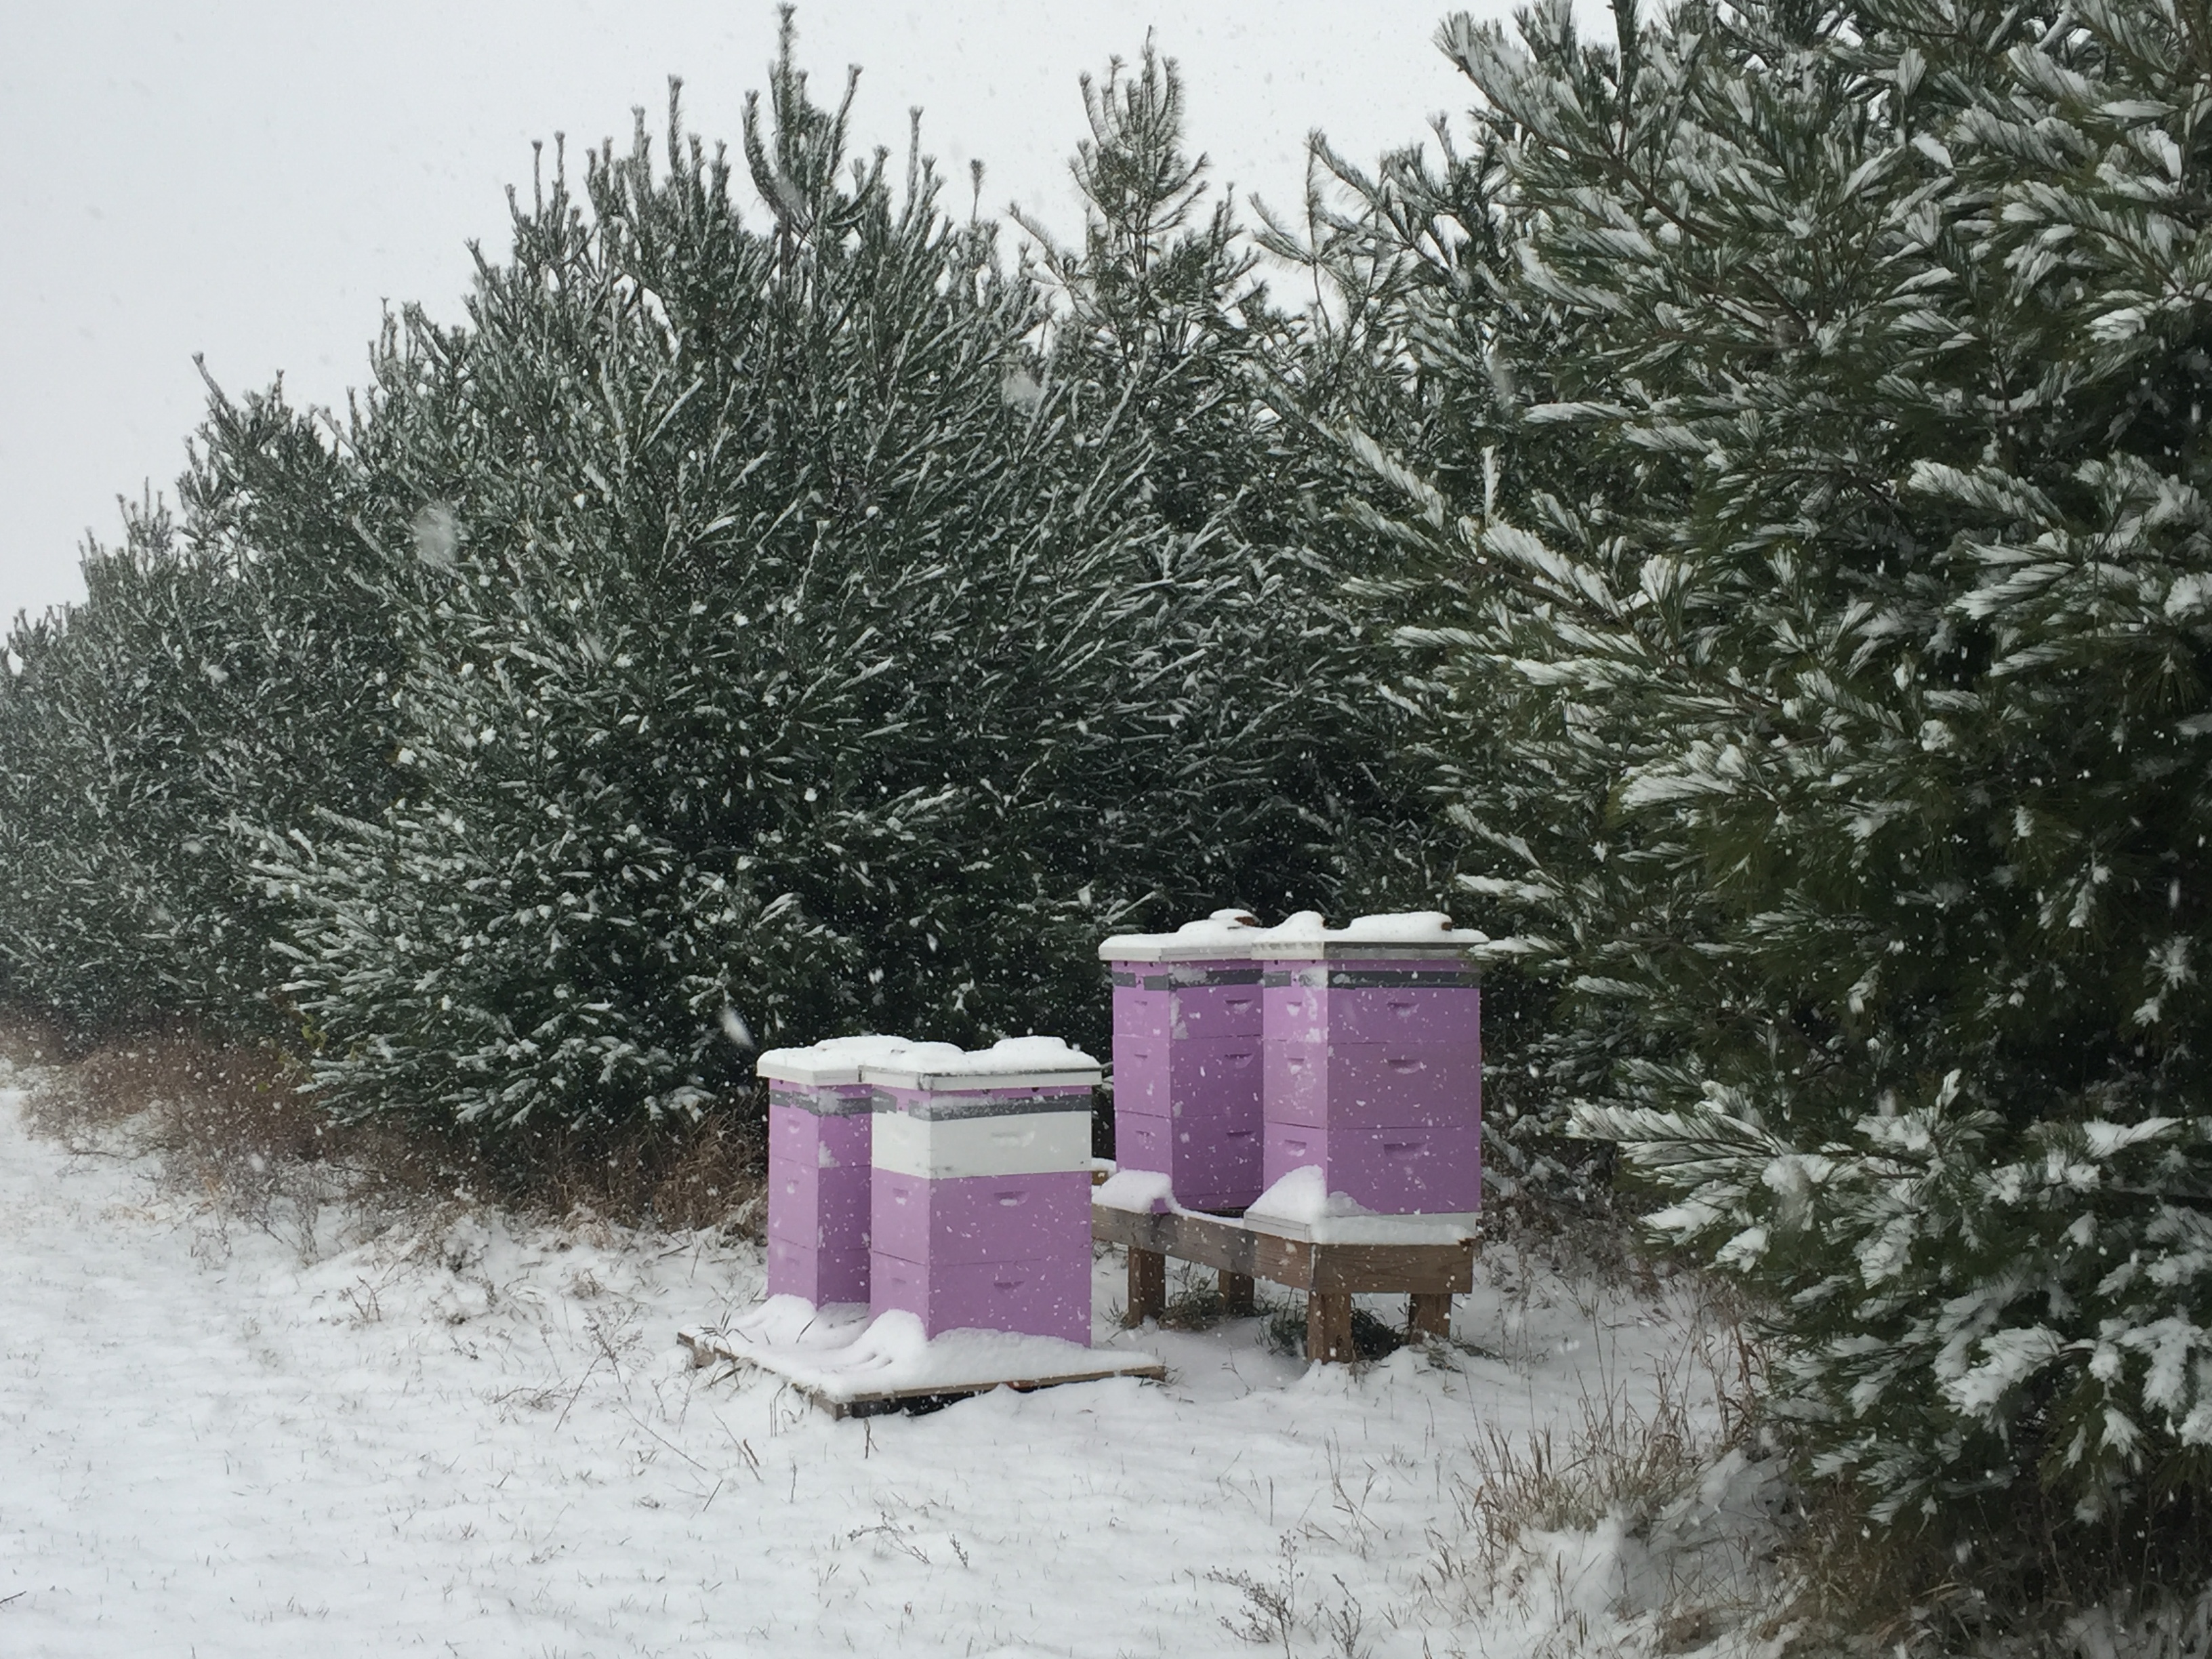
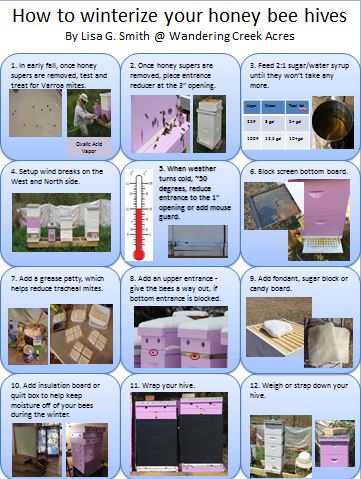
Last weekend, on January 21st (my husband’s birthday), my husband and I checked on our 4 hives. It was 53 degrees, partially sunny and the bees were out flying. The front hives have larger colonies and enjoy the full force of the sun, which keeps them warmer than the hives in the back and therefore more bees, in those hives, were out on a cold day.

Over the last couple of years, I have been saving up medium frames of honey, to be used to feed my bees in winter. I had 1 full super that I was planning on splitting between my 2 back hives. My 2 back hives were created in 2016 and were a little light on stores in the fall.

My 2 front hives were purchased/caught as a swarm in 2015. They overwintered between ’15-’16 and last year produced over 315# of honey, twenty 12oz honey combs and 16 ½ pints of creamed honey. For those two hives, I made 2 fondant blocks (fondant recipe below) in case they needed something extra.

1st 2016 created hive:

I went into the 1st 2016 created hive and noticed the bees were just starting into the top honey super, there were around 40 or so bees at the bottom of the middle frames. I carefully removed the bees and placed in a new frame full of honey and repeated this 4 more times. I also cleaned out the bottom board, finding only a handful of dead bees. (This tells me that the hive is doing well. They were still in their 1st honey super, they are not having a large die off and the colony is healthy enough to successfully remove their expired workers.)

2nd 2016 created hive:

I then opened my 2nd 2016 created hive; here I found the bees cluster at the top against the quilt box. My 1st thought here was that these bees are in need of feeding, my 5 frames of honey, that I was splitting between the two 2016 hives, was just not going to do it. For starters how would I even be able to replace the frames in the box with frames of honey?

I closed up the hive and took a few minutes to think through my options. I’ve been keeping bees for a full 3 years now, going on my 4th. I have many deep frames of honey, produced by my bees over these 3 years. Some of the frames were made using sugar syrup and some by the bees collecting nectar.

I returned to my honey house to collect as many deep frames of honey as possible. I was surprised to find that I had 3 full 10-frame deep boxes worth of honey. I hadn’t realized I was such a deep frame honey hoarder.  J   I was planning on using these to feed Nucs when creating colonies with grafted queens, but keeping my bees alive and healthy is my number 1 priority at this time.

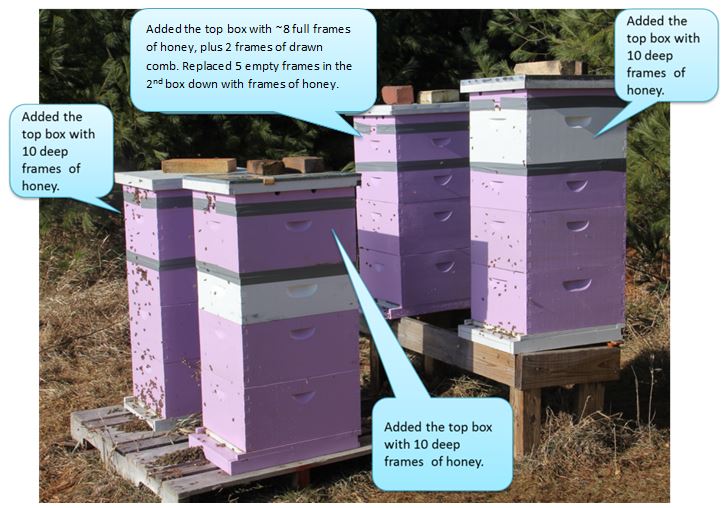
I returned back to my apiary and placed a full deep worth of honey onto the hive.

This hive also had the most dead bees on the bottom board. Not a number that is too concerning (I know what it looks like when a complete hive dies and all the bees are sitting on the bottom board – this was nothing like that), but more than I would like to have seen. (In summary, this hive was running out of stores and probably was dying off from lack of food.  It was a good thing that the weather allowed me to take a peak.)

My 2015 caught swarm hive:

Next I peaked in on my hive that I caught as a swarm in 2015. There were bees collected near the top, near the opening and very few bees on the bottom board.  I don’t believe they needed food, I believe the bees were gathering near the upper opening so they could take cleansing flights.  But to be on the safe side, I gave the hive 1 full deep worth of honey.

My 2015 purchased hive:

This hive was in the same shape as the 2015 caught swarm hive. So, like the other, I gave this hive 1 full deep worth of honey.

Lastly, the 2 fondant blocks and all the extra medium honey frames I could find went onto the 1st hive that I had opened. This gave the hive 13 full frames of honey and 2 fondant blocks.

Once all hives were fed, I sealed up all cracks using duct tape.

final-config

The next time I hear that we will have temps in the 50s on a sunny day, I will make more fondant.

I hope your bees are doing as well as mine are.

~ May all your wandering take you to many wonderful places!

Lisa

Fondant for bees

Tomorrow we are expecting temps in the low 50s. This will be my 1st hive check of the year, beyond laying an ear to the hive to listen for the nice soft hum of the colony.

In preparation for this hive check, I have made fondant incase the bees have reached the top and are in need of food.


The recipe that I followed contains corn syrup. I prefer not to use corn syrup, but it’s needed in the recipe to make the fondant pliable.  The 2 fondant pictures above, were made using the same recipe, just two different finishing methods. The 1st method gives you a hard firm candy.  The 2nd method gives you a softer Fondant.

Fondant for 1 hive

  • 4c sugar
  • 4T corn syrup
  • Juice of 1/2 lemon in a 1 cup measuring cup
  • Water added to lemon juice until the 1c mark is reached

Directions:

  1. Place all ingredients into large pot
  2. Bring to boil over medium-high heat.  Be careful not to brown/caramelize the sugar, this is bad for the bees.
  3. Place top onto pot and let boil for 3 minutes – this melts all sugar crystals, any sugar crystal left will crystalize the fondant
  4. Remove top and boil until the sugar mixture reach 248 degrees.
  5. Removed from heat and place into mixer
  6. When sugar mixture reaches 180 degrees
  7. Beat mixture until it is white and cool.
  8. At this point, Method 1: scrape fondant/ candy into a pan lined with wax paper
  9. OR, Method 2: wet your hands and knead the fondant on a board sprinkled with water

Making fondant is very hard on your mixer and will heat up the motor. In addition, the fondant is difficult to get out of the bowl, since it has a tendency to stick to the sides. If you have any suggestions on how to deal with this, please let me know so I can give it a try.

I think you will find this recipe easy to make and it’s also deliciously sweet.  But beware if you are not careful, it will probably remove your fillings.

If you give this recipe a try, let me know what you think.

~ May all your wandering take you to many wonderful places!

Lisa


Fried Bananas with honey

Each summer when growing up, my family would visit a local orchard and pick peaches, my mom would then spend days in the kitchen canning. I remember the jars sitting in the fruit cellar on the shelves.  (Oh the stories I could tell about that fruit cellar.)

But, I never remember fruit just sitting around for the taking. Perhaps it was, but I just never thought of fruit as a snack and therefore didn’t notice it.

Now that I have a family, I always have a bowl of fruit sitting on the counter. My youngest child prefers fruit over most snacks. Me, on the other hand has to deliberately eat fruit in order to get any in my daily diet.  It’s not that I don’t like it, there are just other things I would prefer (cookie dough, chocolate chips, etc).

While search for a recipe that includes honey, I came across a recipe for fried bananas. What better way to eat fruit, than to add one of my favorite foods, honey!

img_9336

Fried Bananas with Honey

  • In a small bowl, mix 1T of honey with 1t of warm water. Set aside.
  • Slice banana into ¼ to ½ inch slices
  • Coat non-stick frying pan with olive oil and fry banana slices until browned, only flipping once
  • Remove pan from heat
  • Drizzle honey mixture over bananas
  • Carefully remove bananas from pan
  • Sprinkle with cinnamon and enjoy

img_9326img_9327img_9329img_9334

These were delicious, but I’m positive that they would be even better on top of vanilla ice cream. Maybe next time!

If you give this recipe a try, let me know what you think of it.

~ May all your wandering take you to many wonderful places!

Lisa


Pork chops with Spinach salad

I’ve never been a big fan of pork chops.  When I was young I found them to be dry as leather.  If I could get away without my mom noticing that I didn’t take one for dinner, it was a good night. I didn’t have my first good pork chop until the day my husband cooked one. It was then that I realized pork chops were good if they were not overcooked and especially when paired with a tasty side.

The spinach salad in this recipe is the perfect pairing for the pork. It is tossed with a warm honey-mustard dressing, that is made using the tasty bits of pork left in the pan after they are cooked. The salad is also topped with a pickled shallot garnish, which is delicious. (Yes, I am one of those strange people that love pickles, especially sweet pickle. I will even drink the pickle juice right out of the jar.)

dinner

My family found this very tasty and I thought it was a nice way to easily compliment a pork chop.

It was simple and quick!  I marinated the shallots the day before and then all I had to do for dinner was make the honey-mustard dressing, fry up the chops, add the honey-mustard dressing to the pan and reduce, pour the dressing over the spinach and serve!

garnish dressing chops  spinach  dinner

You will find that both the honey-mustard dressing and the shallots use honey!

Pork chops with Spinach salad

Ingredients

  • 4 bone-in pork rib chops (about 12 ounces each)
  • 1 medium shallot, thinly sliced into rings
  • 1 bunch mustard greens, tough stems trimmed
  • 1/4 c plus 2 tablespoons white wine vinegar
  • 4 t honey
  • 1 T whole grain Dijon mustard
  • 2 t mustard seeds
  • Freshly ground black pepper
  • 1/2 t kosher salt, plus more
  • 3 T olive oil, plus more for drizzling

Preparation

1.Shallot garnish:

  • Slice shallot into rings
  • Place shallot and 2t mustard seeds in a small bowl or heatproof jar.
  • Bring the following items to boil in a small sauce pan, stirring to dissolve sugar and salt
      1. 2 t honey
      2. 1/4 c vinegar
      3. 1/2 t salt
      4. 2 T water
    • Pour over shallot and mustard seeds
    • Set aside.

2. Pork chop prep:

  • Season with salt and pepper.

3. Honey-Mustard dressing prep: Mix together in small bowl

  • 1 T Mustard
  • 2 t Honey
  • 2 T vinegar
  • 1 T water

4. Spinach prep:

  • Wash spinach and remove tough stems
  • Spin dry
  • Place into serving bowl

Let’s get cooking:

  1. Heat 3 tablespoons oil in a large skillet over medium-high.
  2. Working in batches if needed, cook pork chops until browned and cooked through, about 3 minutes per side.
  3. Transfer pork chops to a warm plate
  4. Reduce heat to medium-low and add Honey-Mustard dressing to skillet.
  5. Bring to a simmer and cook, scraping up browned bits from bottom of skillet, until liquid is slightly reduced, about 1 minute.
  6. Season with salt and pepper.
  7. Remove pan sauce from heat.

Toss salad with dressing

  1. Season with salt and pepper.
  2. Drizzle warm Honey-Mustard sauce over greens
  3. Toss to coat

Serve shallot garnish

  1. Drain liquid, keeping shallots and mustard seeds
  2. Place into small bowl for serving

Call everyone to dinner and serve

  1. Serve pork chops with greens topped with Shallot garnish drizzled with more oil

You can find the original recipe here,  at the following location.  From the original, I replaced the sugar in the shallot garnish with honey and used spinach instead of Mustard greens.

If you give this a try, let me know what you think.

~ May all your wandering take you to many wonderful places.

Lisa


Honey-Ginger Chicken Stir Fry

Honey, honey, honey!  What to do with all the honey that I extracted last year?  This is a problem that I love to have.

This year I am going to 1) attempt to replace sugar with honey in my current recipes (where it make sense) and 2) try more recipes that use honey instead of sugar.

Early this morning, I did a search for a chicken stir-fry made with honey.  I came across this Honey-Ginger Chicken Stir Fry recipe and decided to give it a try.

After identifying a few changes, I made a quick list of items I needed from the store. On the way home from work, I picked up the needed ingredients, and when I got home I began.  This recipe took me 1 hour from start to finish.  Next time, I may get a bag of frozen mixed veggies to have on hand when I want to make this in less time… but I’m sure it won’t compare to fresh.

Honey-Ginger Chicken Stir Fry

  • Sauce: combine into small bowl
    • 1/4 c honey, slightly warmed
    • 3 T soy sauce
    • 1 1/2 t lemon juice
    • 1 t ginger
    • 1t cornstarch
  • Vegetables: cut into bite size pieces and place into bowl – leave chestnuts as is
    • 1 c broccoli
    • 1/2 c sliced carrots
    • 1/4 c onion
    • 1 red pepper
    • 1 c snap peas
    • 1 small can sliced water chestnuts
  • Chicken coating: mix and place into 1 gallon Ziploc bag
    • 4 T cornstarch
    • 1/2 t salt
    • 1/4 t pepper
  • Chicken, cut into bite size pieces 1/4″ thick and toss with coating
    • 1# of chicken breasts

Directions:

  1. Follow directions above to prepare sauce, vegetables and chicken
  2. Heat 1T oil in a non-stick pan on medium-high
  3. Stir fry chicken until lightly browned
  4. Add vegetables and water chestnuts
  5. Stir-fry 3-4 minutes longer
  6. Stir in honey mixture, toss to coat and heat through.

Step 1: Sauce – Vegetables – Chicken tossed in cornstarch

img_9272img_9273img_9276

Step 2 – 6: Browned chicken – Vegetables added – Sauce added and finished

img_9278img_9279img_9284

If you give this recipe a try, let me know what you think.

~ May all your wandering take you to wonderful places

Lisa


Winterizing

Here in Northern Illinois, winter weather has finally arrived.  Yesterday ~3″ of snow fell upon my farm and my hives.

My bees were all tucked warmly in their homes, which were winterized a month ago.

If you haven’t winterized your hives, there’s no time like the present.  Here’s a list of things to consider.  Decide for yourself, which ones work best for you!

winterizing

May all your wandering take you to many wonderful places.

~Lisa